Uniswap is a decentralized crypto exchange (DEX) and it's probably the most popular one in the world of DeFi. There's no order book here and all swaps are run by the automated matchmaker. Anybody can list any ERC20 tokens on Uniswap which makes it the perfect first exchange for startup projects. In this Uniswap review, we tell you about all the major concepts and show how to avoid mistakes when using this exchange.
Brief Overview
Uniswap fully delivers on the benefits offered by decentralized exchanges (DEX). It's completely permissionless and open to use by anybody without any AML/KYC processes in place. Uniswap is probably the most popular DEX among defi users.
Background
Uniswap was launched in November 2018 by Hayden Adams. The exchange grew popular fast. In May 2020, the second version (“V2”) was rolled out that enabled a suite of major improvements. Thus, if you interacted with the exchange before and didn’t like it that much, you should test it out again. V2 is much better.
Uniswap allows users to easily connect some of the most popular WEB3 wallets. Since there's no centralized order book, you don't have to send any funds to the exchange and always stay in full control of your funds. In a word, it's completely trustless and there's no custody involved here.
No custody and no registrations means no risk of theft or phishing. Uniswap is leading the way in terms of the migration to DEXes which we believe will serve to prevent major attacks like what happened with MtGox.
All transactions run on-chain and incur much smaller fees as compared to what other centralised services charge.
Swapping/Trading Coins on Uniswap
Uniswap enables users to swap any ERC20 coins with any other ERC20 coins in a fast and easy manner.
How to prepare for swapping?
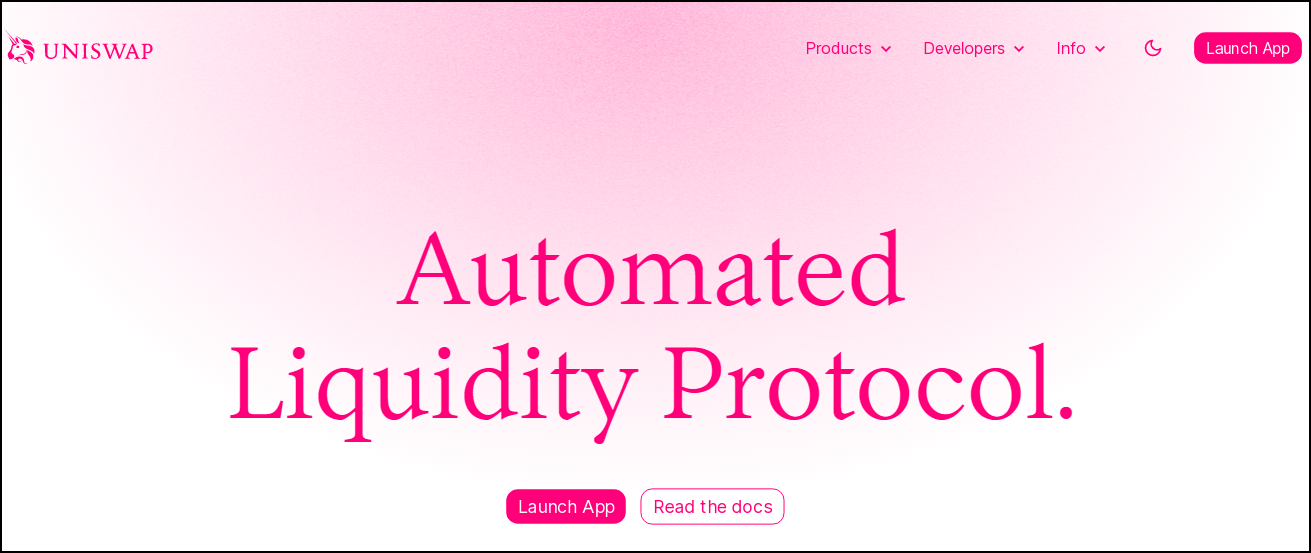
Open Uniswap's site and click the button "Launch App". Next, click button "Connect to a wallet" in the top bar, as shown on the screenshot below.

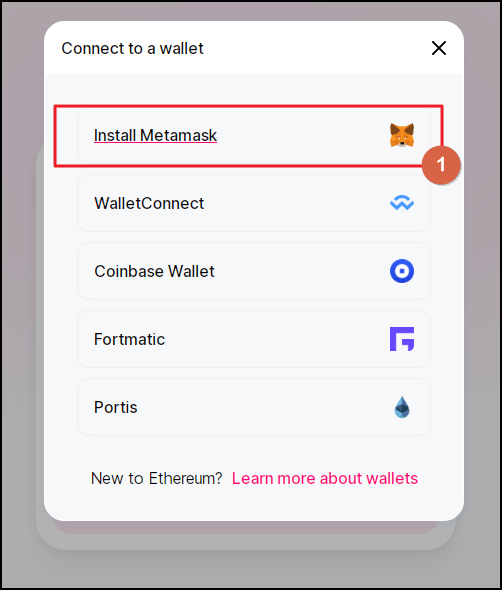
We use MetaMask which is one of the most popular WEB3 wallets around. Open the MetaMask extension in your Chrome browser (or an extension for another browser) and click on the MetaMask in the Uniswap's window.
And now you are ready to swap the coins! It's that easy. As we've said above, this DEX is completely non-custodial and there's no registration process of anything like this.
How to swap tokens
And now let's look into the steps that you need to perform in order to swap coins on Uniswap.
Step 1: Adjust settings for the currency you want to send
As the first step, you should decide the currency you want to pay with.
As you can see in Fields 1 & 2 below, Uniswap shows your total balance in ETH that you have in your Metamask wallet.
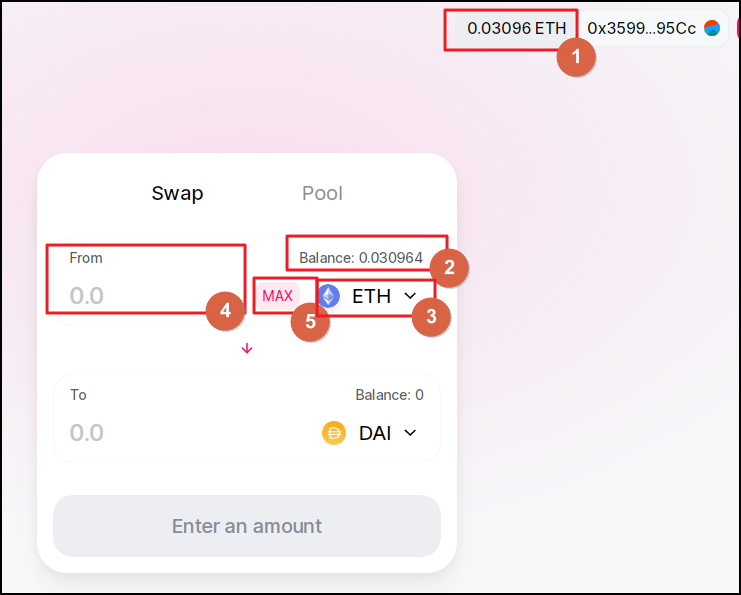
Since you can store any cryptocurrencies in your Metamask wallet, you can pick any one you wish to. Do that in Field 3.
Let's stick with ETH for this example, allright? So, now we have to specify the amount of ETH we want to send in order to receive the coins that we want our paws on. Use Field 4 for this.
To calculate how much ETH you need, go to Binance or another crypto exchange where you have the prices for these coins.
If you feel on top of the world, max it out in Field 5. But never max it out completely though. You should always keep in mind the gas fees. Always.
Now that we've dealt with the outgoing currency, let's move to the coin we actually want to get!
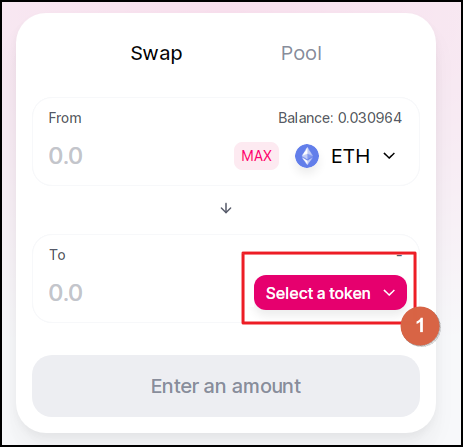
Step 2: Adjust settings for the currency you want to buy
First you need to pick the currency you want to receive in the swap. Go to Field 1 on the screenshot and click on it.
In the new console, you can either type in the coin's name in Field 1. Or you can scroll till you find it manually.
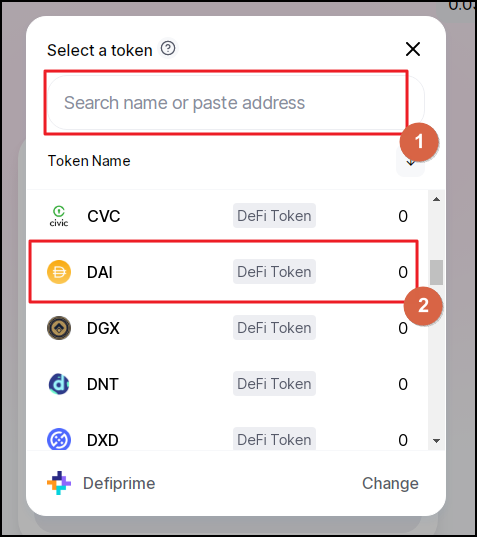
Now we have picked the coin that we want to buy.
How to make sure you don't buy a fake coin
It's important to clarify that anybody can list a token on the Uniswap exchange.
Thus, a certain number of fake coins is being registered. If you accidentally pick those coins and swap your real ones with them, the scammers will receive genuine tokens and you'll receive fake ones.
If you want to swap into a popular coin, like DAI, you don't have to use the below precautionary measures. But whenever you interact with exotic tokens, you'd be better off with them.
#1. Go to CoinGecko and fetch the address
After you've decided on the coin you want to buy, go to CoinGecko.com and input the name of the coin in Field 1.
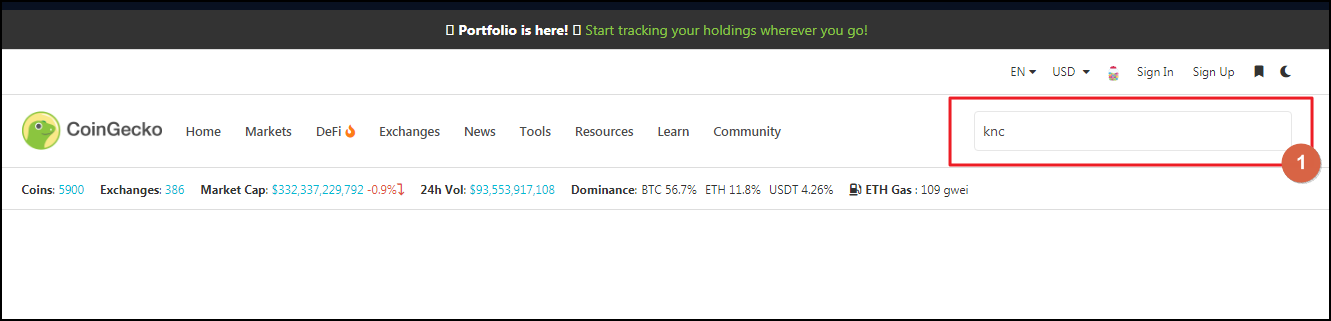
Avoid searching the coin by "coin name + etherscan address" in Google or on Etherscan itself because you will see all those various etherscan addresses. Some of which might have been created by the scammers.
#2. Copy the address at CoinGecko
Scroll down on the coin's page and find the contract address, shown in Field 1 below.
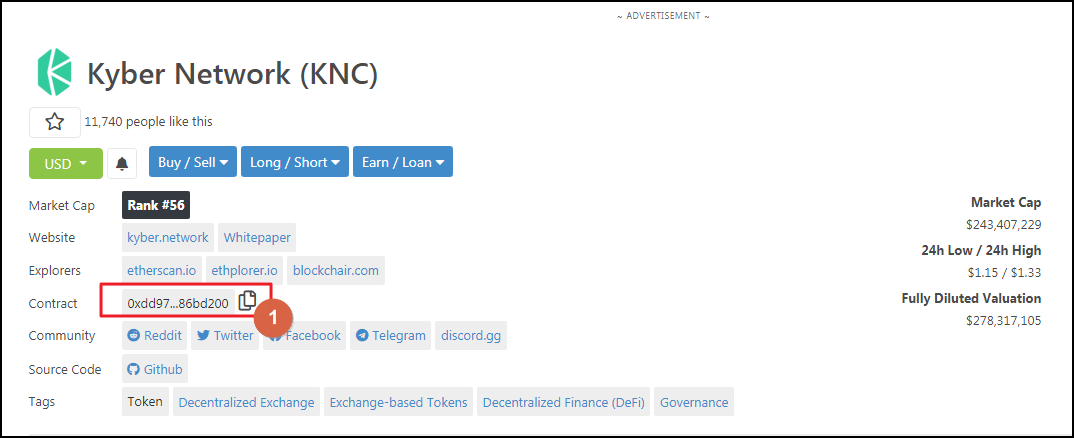
Click on the copy icon to copy it.
#3. Input the address in the search field at Uniswap
Go back to Uniswap and input the contract address right into the search field (Field 1)
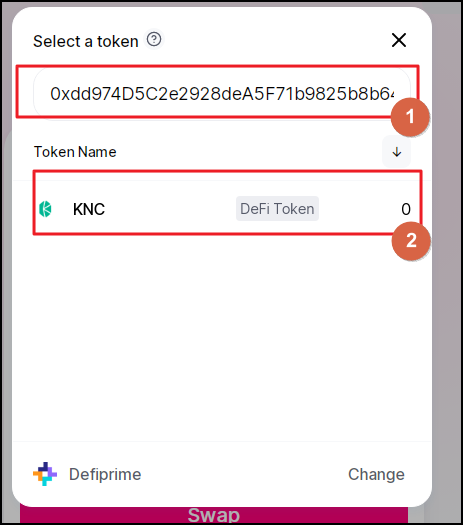
Now, the system will show the genuine coin (Field 2). In this way, you can eliminate any chance of being scammed with a fake coin on Uniswap.
Step 3: Adjust the trade settings
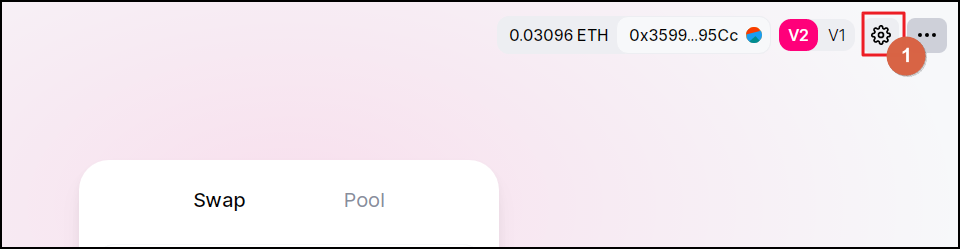
Below the console you'll see the data about the trade you wish to confirm.

We can adjust some of the settings so that the trade better suits yours needs. To do that, go to the top and click the "Cog" button.
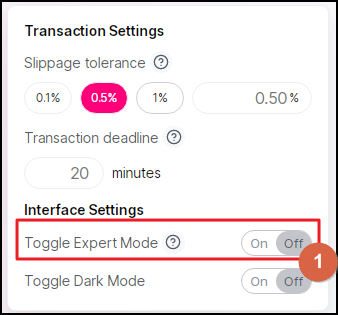
There are two settings modes on Uniswap: Standard and Advanced.
Let's first look at the Standard Mode. In it, you can choose one of the three options for slippage made available to you: 0.1%, 0.5% and 1% in Field 1.

Slippage means the potential deviation between the price you saw at the console and the actual price at which your order executed. Uniswap implements the novel solutions in the form of the Automated Money Maker in order to minimize the amount of slippage you may face. We'll talk more about all of this later in this Uniswap review (Section “Liquidity Provision”).
The higher your order is and the more illiquid the pair, the higher the possibility that your order will impact the market prices and you'll suffer a certain amount of slippage. If you are set on buying a large amount of an exotic coin, you could break down your overall deal into a number of smaller ones and average them across several days or weeks.
In Field 2, you can specify the time period, for which your transaction can be delayed. The longer period you choose, the farther the coin's price might move away from what you aim at.
Now let's see what we can do in the Advanced Mode. To do that, toggle the slider in Field 1.
Now, you can specify the slippage percentage you are OK with, as opposed to applying only one of the values originally allowed by Uniswap. Do that in Field 1.
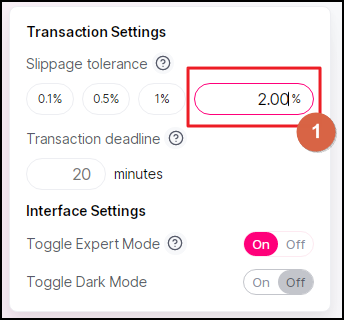
Make sure that you know what you do here because an excessively high slippage rate might significantly eat into the resulting amount of the coins you receive.
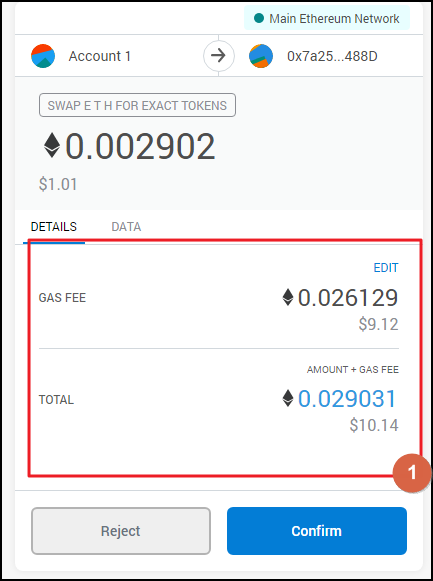
Step 4: Confirm the swap in MetaMask
Now that we are done with settings, click the "Confirm" button and then confirm the deal in the second window.The MetaMask will pop up where you'll be able to review the gas fees. Of course, you can change the fees based on the data from the ethgasstation.
And this is how you can swap coins with ease at Uniswap. As you can see from this Uniswap Tutorial, it's extremely easy to find your way around the UI and the system makes sure that you can't suffer from a huge slippage.
Liquidity provision on Uniswap: How it works
Users can provide liquidity to Uniswap. It's as easy as swapping the coins, and liquidity providers receive the fees for doing this.
What is liquidity provision?
It's an activity when users offer their own funds to the exchange so that there's more liquidity ready to be used by other folks who want to trade. Liquidity provision is extremely important when we deal with illiquid assets, and lots of crypto coins are pretty illiquid.
Those actors who provide liquidity to an exchange are known as liquidity providers (LP).
All exchanges need liquidity providers to be active at their platforms. If there's a lack of liquidity, the exchange will slowly lose its appeal and die.
Uniswap is a decentralized exchange, and it uses the AMM model. Let's talk about this underlying model first so that you understand the basics, and we'll then cover how you can become a liquidity provider here.
What is the AMM model?
As you know, crypto exchanges and cryptocurrencies overall are redeveloping the "legacy" finance. But, of course, we are just trethinking and improving the concepts that previously existed in traditional finance. The first crypto exchanges leveraged the order books that are traditionally used by legacy exchanges. Then the AMM model advanced. Let's compare these two models and see the difference.
#1. Order book model
This model provides for users to place buy or sell orders. These orders are shown in the order book. Below is the order book at Binance.

Users decide at which prices they want to set up their buy or sell orders. These are opened via the limit order, which means that you first look at the market price, then analyse the order book and the chart. And you then create the limit order. The limit order gets activated only when the coin’s price reaches the certain level you identified.
Whenever you do that, you become the "market maker". Now, you are providing liquidity to Binance by "making the market".
Then another user comes along. He is in a rush, and he doesn't want to set up the limit order. Instead he places the market order which means that he buys the coins at the current (aka market) price. He is the "market taker".
In order to incentivise folks to act as market makers, exchanges usually offer them lowered fee rates or no fees at all.
#2. AMM model
The first-generation crypto exchanges, such as Binance and Kraken, used the order book model. Because this is what we saw in legacy finance. We just didn't know anything better at that point.
Then all kinds of coins started to pop up all over the place. Some of them became extremely popular like Dogecoin and Ethereum. Others became not so popular.
But both of these coins are traded by certain actors. You might be thinking "so what, even the unpopular coins can be traded via the order book".
It's true, but whenever traders swap low-liquidity coins, they will face big problems because of slippage.
Slippage as a problem
Let's imagine that you want to buy BTC for 10K EUR. That's so much money, but still.
If you go to Binance and look at the order book for this pair, this is what you'll see.
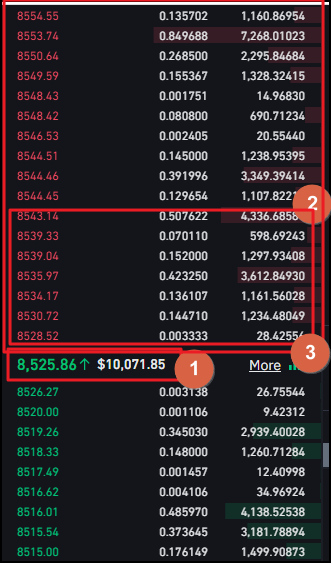
Field 1 on the image shows the current price. Field 3 shows all the sell orders that are present in the order book. And Field 4 shows all the sell orders that you will need to "eat through '' in order to buy the 10K.
Thus, you'll go through all of those orders till the price reaches 8543 EUR! And if the current price is 8525, this would mean that you’ve just made the market increase by 20$.
Of course, there can be another trader who will sell 100K EUR the next second, and the market will go down because of this trade.
So, as you can see, you wanted to buy at 8525, but a certain portion of your buy was expected at 8543. If you calculate the average prices, your final price will be higher than what you saw at the screen. And this increase in the price is slippage.
And it's totally OK to see the slippage like this whenever you trade highly liquid pairs like EUR/BTC. But what happens if there's only ten open sell orders, and there's nobody else willing to sell?
This is what we'll happen:
1) You will eat through all the 10 sell orders present in the order book, and you will buy the offered liquidity chunks at the stated prices.
2) Your order will be executed only partially since there are no other willing sellers on the market, which means that you have just bought out all the existing liquidity on the market!
And, let's say that there's a trader who created - just for fun - the limit sell order, where he sells the coins for 1,000,000 USD. The point is that if you have 1,000,000 USD in your account, the system will actually buy the coin at that price. As a result, the current market price for the coin will be 1,000,000 USD.
Thus, slippage poses a very tough problem for crypto markets where there's a lot of illiquid coins. And, generally, this is the problem faced by all illiquid markets, for instance houses, paintainings, jewellery, etc.
DEXes have the blockchains and smart contracts to play with and try to solve this problem.
AMM as a solution
Instead of using the order book like the legacy exchanges, Uniswap has implemented the Automated Market Maker (AMM). In this model, any actor can become a liquidity provider when they provide the liquidity not in the form of the buy/sell orders, but in the form of the actual tokens. And instead of offering just one token, they offer the liquidity for both tokens in the pair.
Here's how this process works with the ETH/BAT pair as an example.
1. Trader opens the deal to buy 100 BAT with ETH
BAT currently costs 0.0007 ETH. Let's say that the trader wants 100 BAT. Thus, the price for 100 BAT will amount to 0.07 ETH.
The trader sends the 0.07 ETH to the smart contract on Uniswap.
2. LP pools the liquidity into the pool
There are 1000 LPs who provide the liquidity for this pair because it's popular. Thus, there's a pretty big pool here.
This is done before the trade has been opened.
The pool needs to stay in equilibrium. The model used at Uniswap is actually called the "Constant Product Market Maker" (CPMM) which is a subtype of the AMM model.
The model leverages the formula x * y = k, where x - the reserves of token A, y - the reserves of token B, and k - the product of the two. The rule of the game here is that the product should always stay the same.
As we said above, the rules say that the pool should contain the equal USD-denominated values for the tokens on both sides. Thus, let's say that there's 500 ETH in the pool. This means that there should be 714,000 BAT tokens too.
3. Liquidity pool processes the trade
The Liquidity Pool receives the 0.07 from the trader.
Then it sends out the respective amount of BAT tokens, i.e. 100 BAT tokens.
After the pool has processed the deal, the amount of ETH has grown and the amount of BAT tokens has reduced, while the product (k) stays the same.
4. System charges the fees
The system sends back 100 BAT to the user, while also charging 0.3% from the ETH amount as the fees. The fees are sent to the liquidity pool and distributed among all the liquidity providers there in order to incentivise their involvement for continuous liquidity provisioning.
5. BAT price increases
The trade results in the increase for the BAT price. The price increases are controlled by specific formulas used at the exchanges. Each of the exchanges has their own formulas. But all of them imply that whenever a user places a very large buy/sell order, the token's price is going to increase/decrease a lot which serves to imitate the real price behavior we would see at the traditional exchanges with order books. Thus, they implement a certain slippage.
6. Arbitrageurs act to reduce the BAT price back to the original level
Another group of actors on exchanges like Uniswap is arbitrageurs. These are actors who are trying to make profits on trading the differences between different exchanges.
Exchanges with order books are used as "reference exchanges". Arbitrageurs constantly monitor them using bots and identify any price differences. They act to equalise the prices across all the exchanges.
Here's how they do this:
1. BAT was 0.0007 ETH at Uniswap
2. BAT was bought and now it's 0.001 ETH at Uniswap, i.e. it grew by 0.0003 ETH.
3. The arbitrageur goes to Uniswap and sells 1000 BATS for ETH (1000 BATS * 0.001 ETH = 1 ETH).
4. This pushes the price of BAT down on Uniswap.
5. Now the arbitrageur goes to Binance and buys their BATS with ETH at the price of 0.0007 (which stayed there the same). The calculation is 1 ETH / 0.0007 ETH for 1 BAT = 1428 BAT.
Thus, the arbitrageur has just made 428 BAT just by buying and selling coins between different exchanges, minus the fees.
These days, the arbitrage opportunities are quickly consumed by bots and exchanges themselves which acts to quickly equalise all the active exchanges on the market.
One of the major problems with providing liquidity to such exchanges as Uniswap is the impermanent loss. It does take its toll on your RoI and that's why you should always be on the lookout for it.
Now that we've dealt with the underlying concepts, let's see what you actually need to do in order to provide liquidity to Uniswap.
How to provide liquidity at Uniswap: Step-by-step guide
Here’s the detailed description for liquidity provision at Uniswap:
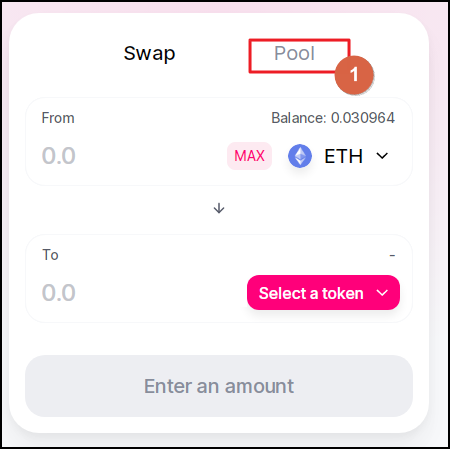
Step 1: Enter the Pool Mode
Go to the app's main page and click the "Pool" button.
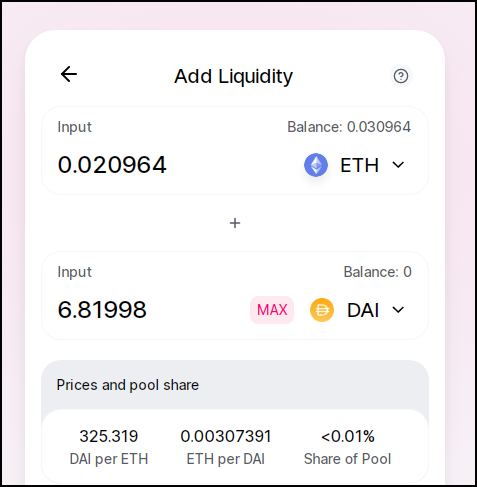
Then click the "Add Liquidity" button.

Step 2: Pick the pair
Then you'll need to pick the pair, to which you want to add the liquidity.
Which pair to pick
Naturally, the most popular coin pairs are going to feature the highest volumes of trades. Thus, they will yield the largest amounts of profits. At the same time, there will already be a lot of LPs here so you'll receive only a small piece of the action.
While you should steer clear of extremely exotic pairs, it might make sense to provide liquidity for less popular ones in your search for higher RoI.
Step 3: Start receiving the Pool Tokens
After you've become a LP with a pool, you'll start receiving the Pool Tokens. You can convert them into one of the tokens within the pair at any moment and withdraw your profits.
Conclusion
Uniswap is extremely easy to use. You can swap any ERC20 coins between each other. Users can also park their idle coin reserves and become liquidity providers. No need to register, go through AML/KYC procedures and lose custody over your funds. All the transactions run fully on-chain which makes them extremely safe. Uniswap is used by lots of people on a daily basis which proves that their smart contracts have been tested out in the wild for many months as of now. Uniswap is probably the biggest DEX among investors into DeFi projects.